Wednesday 24 August 2011

A clean-freak in paradise!

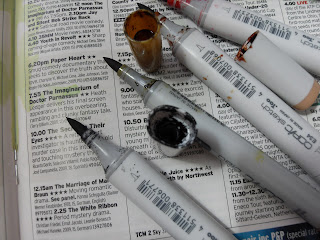
Hi all, I've found something else I can clean!  I thought I'd show you some before and after photos of my copics. I've spent the last couple of days cleaning them up with some rubbing alcohol. It's only after seeing these photos that I realise just how mucky my poor markers were....the ink was literally congealed and sticky around the ends of the markers and in the lids.


BEFORE:
These weren't even the worst!

Caps like this had to be soaked to loosen some of the gunky ink

The ink on that Y28 in the foreground was actually hard!!

Oh, the shame! How could I do this to my beloved markers?

Well, these babies are workhorses, you know!


AFTER:
Shiny shiny markers; happy face :)

Please tell me I'm not the only shamefully grubby colourer!

It took me about 150-200 ml of alcohol , many cotton buds (Q Tips), 2 pairs of protective gloves, loads of paper towels, and a big fat fume-induced headache to clean about 200 markers, but now they are gleaming.

Happy cleaning!


Sunday 21 August 2011

Cici is Grounded!

Happy Saturday everyone, I hope all are enjoying a pleasant weekend. Saturday morning can only mean one thing.....a new challenge at Make It Colourful! This week is a good one and a useful one too - we want you to add some ground to your image. It's a useful thing because it stops your image looking as though it's floating in the ether somewhere, and it's really easy to do.

Make It Crafty is sponsoring this challenge and there is a FABULOUS prize on offer for the winner....the Urban Street Elements Collection!!!! I'd be entering just for the chance to win that, I can tell you.

There are a number of ways of adding some ground for your image....pop over to the main challenge blog for some more ideas.

So this is my card....now you know I usually do lots of ground for my images, I'm not one to leave any white space uncoloured, he he. So I challenged myself to colour just enough ground for my image and no more. I chose this image from Make It Crafty again (I used her last week - sorry for the repeat but I really love colouring this stamp) and I quite like leaving a lot of white space around her.

How I did the ground:  I added grass round her feet by using 3 shades of copic greens (G21, G24 and G94) and used little upward flicks of the markers to make the blades of grass. I practiced first and found it better to start with the lightest shade and then use the medium and lastly the darkest shades. 

I used blue green shades for the dress and flower to fit the themes at Copic Creations and Crafts For Me (see below for the shades I used), but I like those colours anyway. I also changed the colours of the flowers from pale blues to blue greens to match the flower in Cici's hair. The little dragonfly is a lasercut chippie by Make It Crafty, kindly sent me by the gorgeous Zoe, and I used a fluid chalk ink pad to colour it red. A few blue-green gems add a bit of bling.


Image: Cici by Make It Crafty
Colouring: Copic markers (Blue greens are: dress-BG72,BG75. Flower-BG000,BG01,BG05,BG09 and BG10,BG13,BG15)
DP: unknown (a gift)
Flowers, card candy, leaves, lace and gems from my craft stash

------

I'd like to enter this card in these challenges:
Aud Sentiments - Anything Goes
Copic Creations - blue greens
Craft Us Crazy - Anything Goes
Crafts & Me - blues or blue greens
Creative Inspirations - use your favourite stamp
One Stop Craft Challenge - bold and bright
Papertake Weekly - bingo (Gems-FREE-lace; Blooms-FREE-lace)
Truly Scrumptious - lace it up
Whoopsi Daisy - anything goes


I hope you like it. For more ideas for grounding your image, check out my fellow teamies cards.

Have a lovely weekend, and happy crafting!


Dream Valley Challenge #14 - Colour Challenge: lemon, lime & orange

Good morning bloggers!  There's a new challenge at Dream Valley today, and it's something a little 'zingy' for you.....a colour challenge:

LEMON, LIME AND ORANGE 


Our sponsor this week is Stitchy Bear, and one lucky winner will receive a $10 voucher for their store!


The Design Team were given some images to play with, and this is what I made:

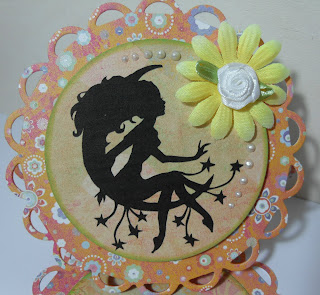
I used the Stitchy Bear image Fairy Moon, and some yellow and orange patterned papers, green fluid chalk for the edges, green ribbon and yellow flowers. I took the black from the colour photo above and used that in the sentiment and of course the silhouette image. Some liquid pearls finish off the card.  I've never made a circular easel card before, and I don't usually use such bright colours, but it's nice to try something new.

DPs: DCWV, Pocket Full Of Posies papers
Nestabilities dies:  Lacey Circles and Deckled-edged ovals
Sentiment: from computer, font is Noir-et-blanc
Pearls: Viva pearl pen
All flowers and ribbon from my craft stash.


------
I'd like to enter this card in these challenges:
Aud Sentiments - anything goes
Bunny Zoe's Crafts - easel cards
Do You Stack Up - Thank you
Fresh Brewed Month Long Challenge - Hot theme (hot colours)
One Stop Craft Challenge - bold and bright
Papertake Weekly - bingo (Gems-Ribbon-Blooms; FREE-pearls-blooms; and Pearl-Ribbon-FREE)
Stamp Something - Thank You
Top Tip Tuesday - Thank you cards
Whoopsi Daisy - Anything goes

--------
You'll find more inspiration and some fab cards from my teamies over on the main challenge blog

Hope you haven't got a headache from the bright colours, he he. 

Happy Crafting!

Sunday 14 August 2011

Make It Crafty and Whimsy Stamps meet on the street!

Whimsy Stamps & Make it Crafty have come together to create a fun Urban Themed digi collection!

Ann Vento has whipped up her magic and designed an
incredible collection of funky wall sayings, city landscapes and of course a range of super cool street signs.

Make it Crafty is trying something new offering all the different elements for you to build your own urban backdrop.

Then of course, what better characters to incorporate into such a scene than the fabulous KennyK rubber stamps available from Whimsy Stamps!

Our incredibly talented Design Teams have had a blast playing with all the different elements to bring you LOTS of inspiration!

We have broken it in to TWO HOPS
HOP A Starts Here & HOP B Starts HERE!

There will be a winner for EACH HOP and if you hop your way through BOTH, you’ll go in the draw for the GRAND PRIZE TOO!

HOP A & B Winners will each receive a $15 voucher from both Whimsy Stamps and Make it Crafty.

The GRAND WINNER will win our full Urban Digital Collection:
4 Digi Sentiment sets by Ann Vento & the Urban Elements Collection from Make it Crafty.


You are currently on HOP B and should have arrived from ANNIKA

I made 2 cards, the first uses Kenny K's Boogie Down, 4 images from the Make It Crafty Urban Street Collection,
and 2 of the new Whimsy sentiments:

Coloured with Copics; paper is Basic Grey 'Archaic'; black pleated ribbon and stars are from my craft stash

And my second card uses Kenny K's Victory Kid,
4 images from the Make It Crafty Urban Street Collection,
and 2 of the new Whimsy sentiments:

Coloured with Copics; paper is Basic Grey 'Archaic'; 7 different coloured eyelets are from my craft stash.


Your next stop on HOP B is MARILYN, but before you go make sure you leave a comment below!

You have until August 21st 8PM Australian QLD time to make your way through the hops!

Be there... or be square! J

vvv
I'd like to enter the first card (Boogie Down) in these challenges:
Craft Us Crazy - Anything Goes
K B Cute Monday - Anything Goes With a Digi
Meljen Designs - use black
One Stitch At A Time - Anything goes
Sir Stampalot - Whatever You Fancy
Some Odd Girl - Complimentary colours (blue and orange in her clothing)

vvv

I'd like to enter the 2nd card (Victory Kid) in these challenges:
Cards For Men - Clean and Simple
Colour Create - Blue Green White Brown and Red
Craft Us Crazy - Anything Goes
Incy Wincy Designs - Something Old, Something New (my backing paper and eyelets are so old now, and the images are all brand new)
K B Cute Monday - Anything Goes with a Digi
Kaboodle Doodles - use Primary colours
One Stitch At A Time - Anything Goes
Paper Creators Craft - Red and blue
Sparkles Forum - One For The Boys

vvv


-------

Saturday 13 August 2011

You're Yummy!


Good morning all, and firstly let me tell you that something exciting is happening tomorrow, so check back then to find out what (wink).

Well, it's a new challenge at Make It Colourful today and it's a bit of a stretch this week, but a rewarding one if you give it a go. This week we want you to Colour Something Wet. Now, that doesn't mean using gloss to make some shine, you have to use colouring to make something appear wet.


Our sponsor this week is none other than Mo Manning, and the lucky winner will receive their choice of 2 digi images from Mo's Digital Pencil.

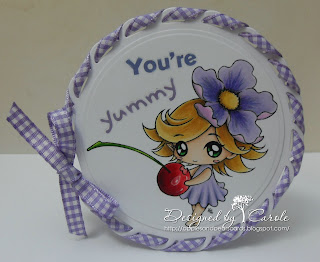
I only had time to have one go at this, but here it is. I used a simple image because I was scared of making a mess of the water drop. So I chose this sweet digi image from Make It Crafty.....she's called Cici, and it's one of those images that really grows on once you colour it up. I decided to make a drop of juice running down the cherry from the bite. Do you think it looks convincing?  Well, I feel I need more practice at this, but it's a nice way of bringing a little something of your own to the image.  So you see you have to enter this challenge so I can get some tips for how to do a better job!

And I'm super chuffed to have been able to make a one-layer card at last because there is not one bit of backing paper, embellishment or stuck-on sentiment anywhere! It has been my ambition for some time to be able to enter the Less Is More Challenge.....look at all that white space....take it in girls cos you don't know when you'll see me being this restrained again, he he. (Actually, I secretly really enjoyed it and am hoping to do it again soon!)
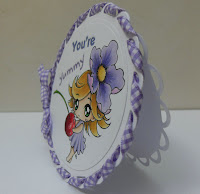
If you're daunted at the thought of colouring a water droplet, here is how I made mine: as I started to colour the cherry, I used my palest colour to draw the outline of a droplet and coloured around it till the cherry was nearly finished. Then I filled in the body of the droplet using a paler shade than the cherry surrounding it, but left a thin white uncoloured line around the colouring inside the drop. I added a little shading to the inside of the water droplet on the opposite side from the light (which was coming from the right side), and a small dot of white gel on the side nearest the light. Then I added some shadow on the cherry to the left of the drop (away from the light), and lastly went over the white uncoloured outline of the drop with a pale pink. There might be other ways of doing droplets, but that is how I did mine.


Colouring medium: Copic markers
Other: Nestabilities Lacy Circles die; rub-on sentiments
Gingham ribbon from stash


I'd like to enter this in these challenges:
Challenge Up Your Life - no patterned paper
Craft Us Crazy - Anything Goes
Crafty Sentiments - Dies and punches (card is made from 2 die-cut lacey circles stuck together)
Cute Card Thursday - Clean and Simple
Digi Doodle Shop Challenges - Shaped cards
Fresh Brewed - Clean and simple (less than 3 embellishments)
Hooked on Crafts - Sweet Treats
Incy Wincy Designs - Something old, something new (the ribbon is very old, the stamp is brand new and bought just for this project)
K B Cute Monday - Anything goes with a digi
Some Odd Girl - use complimentary colours (I used blue-violet and yellowy-orange)
Totally Gorjuss - Round and round


I will definitely use this gorgeous image again, she was a joy to colour. So, until tomorrow have a lovely Saturday everyone.

Happy Crafting!


Friday 12 August 2011

A date for your diary....

Hi everyone, just drawing your attention to a new blinkie on my sidebar. Put the date in your diary cos you won't believe the brilliant stuff being released that day. Honestly, you will want!

Carole x

Sunday 7 August 2011

Today's the day!

Hi everyone, I have a bit of exciting news to share with you at last......I am one of the new DT members at Sundays With Crissy! I was so happy that Crissy asked me, not only because I had just discovered her images not long ago and loved using them, but because that challenge is one that I always looked up to see what the current theme was and loved entering it. I won her Artist Choice Award a couple of times too, so all in all this is great for me. I've had to keep a lid on it till now, but as today is my first DT post I can shout about it at last, he he.

This challenge is slightly different in that the Design Team showcase their cards throughout the month rather than all together when the challenge is announced. So if you drop in to Sundays With Crissy regularly, you'll see more cards uploaded every few days. I'll be posting early each month.

So the theme for this month's challenge is K.I.S.S. which stands for Keep It Simple Stamper. We'd like you to keep your card as simple as possible, something which is more of a challenge for some of us than others!


For my DT card, I used this fabulous image by Crissy Armstrong called Dance of Love. I pictured this very brightly coloured, so I chose a bright paper to go with it, and kept the design very simple.....just the image, a couple of nestie circles to frame it, a strip of black pleated ribbon with some green ribbon on top, and a couple of chipboard corners that I coloured with copic ink, with gem hearts mounted on them.


Image: Dance of Love, by Crissy Armstrong
Colouring: Copic markers
DP: Memory Box, Brioche
Lasercut chipboards corners by Make It Crafty
Other: Nestabilities Lacey Circles
Black pleated ribbon, green ribbon and pink gem hearts from stash


I'd like to enter this card in these challenges:
Allsorts Challenge - Red as the main colour
Fabulous Friday - use colouring on your project
Sir Stampalot - Whatever you fancy
Sketch & Stash - My stash: brand new chipboard corners, and old old really old gem hearts found in a box in my craft box. Green ribbon is also an oddment that has been lurking unused for a long time.
Stamp Something - Use a digi

 I hope you like my card - don't forget to visit the main challenge blog again throughout the month to see more inspiration from the Design Team.


Happy crafting!


Dream Valley #13 - Distressing

Hi everyone, I'll be back later this evening with another post and the bit of news I hinted at yesterday (yes, 2 posts in a day!! very unlike me, he he) but in the meantime I'm here with a new DT card for Dream Valley Challenges, which this fortnight has the theme of Distressing.

We have 2 sponsors again this week: One Stop Card Crafts who are giving away a £10 gift certificate for their store, and Digi Doodles who are giving a $10 gift certificate for theirs, so 2 lucky winners will receive prizes.


So here's my card, and it's one that I made for my lovely blogging friend, Joan of Stamping With A Passion, who lives in Texas in the US. We met through blogging, and wanted to exchange cards so I made this specially for her. I've added some distressing in the form of inking round the edges of the papers, and I also used my Tim Holtz distressing tool to scuff up those same edges. A little handstitching further helps define the edges, and some embellishments from my stash complete the card. I hope you like it.


Image: Magnolia Tilda
Colouring: Copic markers
Papers: Prima Moulin Rouge
Flowers and pearls: Wild Orchid Crafts
Other: Magnolia Doo Hickey Rose Leaf die
Lace from stash
Computer-generated sentiments

I'd like to enter this card in these challenges:
Ellephantastic - Add some layers
Emerald Faeries - Lace
Fabulous Friday - use colouring on your card
Just Magnolia & hAnglar - Anything Goes, optional glitter
Just Some Lines - Outdoors/Summer
Kaboodle Doodles - In The Garden
Little Darlings - Girly
Paper Creators Crafts - All About Flowers
Patties Creations - faux or real stitching


Saturday 6 August 2011

In the Pink!

Good morning all, and please forgive me for not being around much in the last couple of weeks - a mixture of eyestrain and still more need for rest has kept me off the computer, although I have tried to still visit blogs but on a less frequent basis. I've also been busy making more cards than I usually would make - 2 this week so far! lol.

Anyway, being Saturday, there is a new challenge at Make It Colourful today, and you'll like this one.....COLOUR IN PINK. That's it, just use pink as one of the colours in your image. We'd like to see you feature pink though rather than just have a tiny bit somewhere in your colouring.

Our sponsor is Bunny Zoe's Crafts and Nicki is offering a £10 gift voucher to her store as a prize this week

This is my card: the fairy image was a freebie from Digital Two For Tuesday, and I used it to make a scene using 2 Make It Crafty digi images: the Whimsical Mushroom, and the Tulip Garden which is a brand new release (links to the stamps are in the card recipe below). There's a whole bunch of new garden images available if you just want to add a simple background to your image, and I used this image twice behind the mushrooms and fairy.  Colouring is in Copics as per usual and I took pinks from different colour families for my image today: my favourite copic pinks are actually in the Red family - R81, R83, R85 & R89 - and these are what I used on the dress. The wings are coloured mainly with the Red Violets RV000, RV02, RV10 with a little R83, and lastly I used some pinky Violets - V91 & V95 - on the mushroom to give it a slight pink tone.  I also used my markers to colour up a couple of lasercut chipboards (also from Make It Crafty). I kept the layout very simple as it was a quick-ish card, and also to let the image stand out more. Hope you like it. And do drop by my fellow teamies blogs, I can tell you their designs are really beautiful.


Images: Fairy, a freebie from Digital Two For Tuesday
Whimsical Mushroom from Make It Crafty
Tulip Garden from Make It Crafty
Colouring: Copic markers - pinks used: R81 R83 R85 R89 RV000 RV02 RV10 V91 V95
Flower: Prima
Other: Martha Stewart doily punch, Stickles glitter, and ribbon from stash


I'd like to enter this card in these challenges:
Clearly Inspired - Things with Wings
Copic Creations - Landscape Design
Crafts & Me - Anything goes
Fabulous Friday - use colouring on your card
Kaboodle Doodles - In the Garden
Kelley Kids - Anything Goes
Little Darlings - Girly
Poodles Parlour - Round and round the garden
Stamp Something - Use a digi

It's been so long since my last blog post that I had to think how to do all the links and add the photos! It won't be so long till my next post....I'll be back tomorrow with another card and a bit of exciting news.

Happy crafting!